Untitled document
The RELAXOTRON
December 3, 2009
All procedures described below are provided for informational purposes only.
Any implementation shall not involve my responsibility.
This page is dedicated to all kinds of vertebrates. Here are the plans and construction method for a four-cubic-meter heated hydrotherapy pool that can benefit many people. It can easily be used by two people.
Let’s start with the dimensions. It’s “a giant-sized bathtub”:
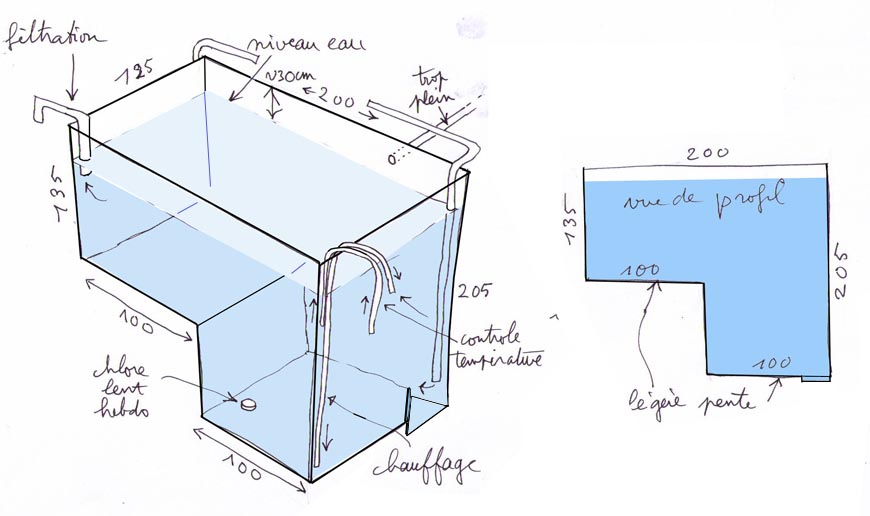
The giant-sized bathtub
Basically, there’s a “small bath” on the left side, where there’s one meter of water depth. On the right, there’s a “large bath” with 1.75 meters of depth. For me, this allows me to fully submerge myself. But if you’re taller, you can add as many centimeters as you wish.
Plan for a slight slope—one centimeter per meter—so that water converges toward a “low point” when cleaning the pool with a hose. As we’ll see, there’s no drain plug. Once a month or every two months, we empty the pool from above using a “basement pump.” The advantage is that “there’s no risk of leakage from underneath, whose effects on a building would be uncontrollable and irreparable, unless everything gets torn down.” This pump is lowered to the bottom of the pool and attached to a rope so it can be pulled back up. It rests on the bottom and has a float that stops the pump motor when the water level drops below seven or eight centimeters. We finish emptying the pool using a scoop or some kind of rectangular bucket found at big-box stores. Interior cleaning is done with a hose and sponge. We leave a “low point” in one corner to collect whatever needs to be removed with the sponge. But later we’ll see that thanks to the “manual robot,” cleaning can be done effortlessly.
There are two completely separate water circulation systems. One, built using PVC pipes with a 3 cm inner diameter, ensures water circulation via a pump that also handles filtration. The other heats the water and maintains its temperature via a thermostat.
Just a few words about filling and draining:
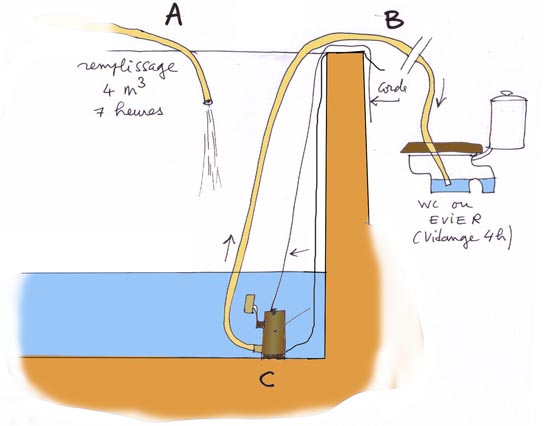
Filling – Draining
Fill using a garden hose or faucet, if you handle plumbing yourself. Plan for an overflow hole with proper drainage.
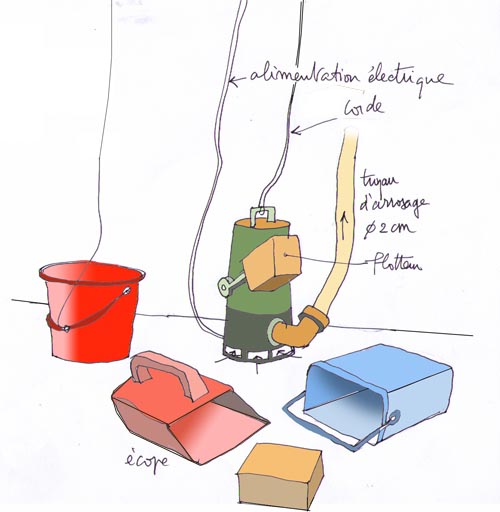
The basement pump and various accessories for emptying and cleaning the pool (in the foreground: a sponge)
Now, let’s move on to construction. This isn’t “a garden accessory” meant solely for outdoor use; it’s a pool intended for year-round use, available 24/7 (I use it daily). It holds four cubic meters of water—that’s four tons! You can’t install this on a balcony or on the fourth floor of an apartment building. As we’ll see, it can be placed inside your house, even right in the middle of the living room or bathroom. How? We’ll get to that later.
It’ll be a semi-buried structure. So first, you must dig—either in a ground-floor room, a garage, or a basement. Unless you decide to put the pool under a greenhouse in the garden. That would be easier since you could then use a small construction machine to dig (there’s about six cubic meters of earth to remove, and you must plan where to put it), and once the pool is finished, you can cover it with a glass-and-aluminum greenhouse with sliding doors, etc. We’ll see that heating such a greenhouse poses no problem. Well, let’s start digging. You’ll determine the excavation dimensions based on the method you choose for building the tank. The “heavy” solution: reinforced concrete blocks (reinforced with 5 mm iron rods; look it up online), 20 cm thick. But we can make it lighter. At a pinch, we could even consider a marine plywood tank, which would serve only as a casing, remaining in place. We could also use a ready-made pool, such as a trough from the food industry or by cutting off the top part of a septic tank or storage container. They come in all sizes. I couldn’t go that route, which would have cut costs, because I couldn’t get such an object through a standard door.
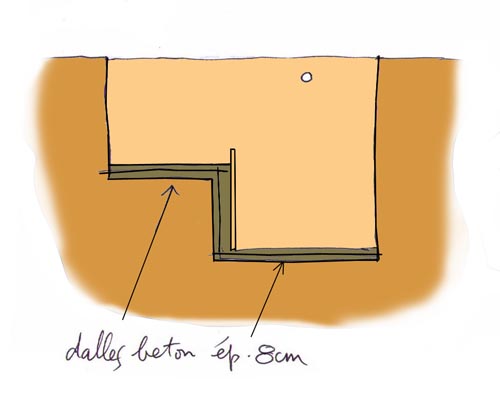
The tank—the heavy-duty solution. Cement slabs reinforced with 5 mm rods
Second step: stack the reinforced concrete blocks (crosswise!).
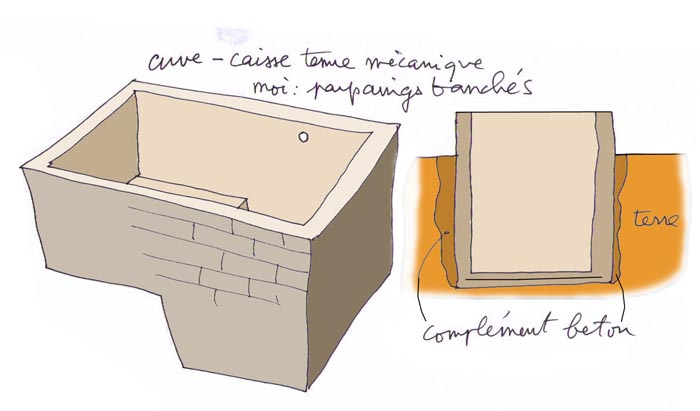
No fear of the tank opening up; it’s held down by earth. Plan for an overflow hole. Height of the exposed part: 70 cm or less, depending on your preference (and height). You can also bury the pool almost entirely. De gustibus et coloribus non disputandum (about tastes and colors, there’s no debate).
Next step: after buying 6 cm thick polyurethane sheets (at Leroy Merlin or elsewhere, 1 m x 1 m each), glue them to the concrete blocks—for instance, using tile adhesive. That’s what I did. Some products have paper coating on both sides. Peel off the paper on the inner side to ensure resin adhesion when applying the interior lining. Tools needed: just a utility knife. Make sure to create a slope of one centimeter per meter, and at the bottom of the pool, direct it toward a “low point.” Polyurethane provides excellent thermal insulation.
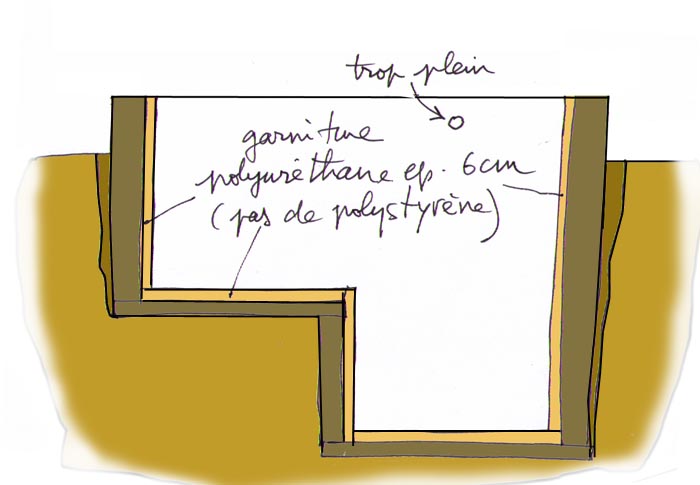
Lining the interior with glued polyurethane
Next, prepare the surface so you can apply resin soaked into fiberglass cloth (similar in texture and thickness to a blanket). Apply two layers for good waterproofing and expel all air bubbles. If you’re unfamiliar with this technique, hire a specialist and pay him. Avoid sharp corners, both outside and inside. Inside, attach rounded corner pieces, 2 cm wide. Smooth out any protruding edges using coarse sandpaper. Then you can line the interior with resin. I had a professional do this.
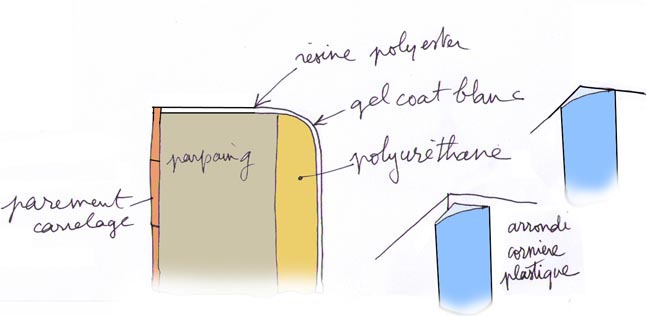
Applying resin soaked into fiberglass cloth. Surface preparation
Be careful with the joint between resin and overflow pipe so that if you forget to turn off the faucet and excess water flows out, it won’t accumulate inside the structure—which would be catastrophic and impossible to fix.
The pool structure is now complete. But here, I think I could have built this pool at five to six times lower cost. In fact, this reinforced concrete block structure ends up being unnecessary, since the pool is either semi-buried or even fully buried. The first task, which requires only manual labor, is digging. See Figure A.
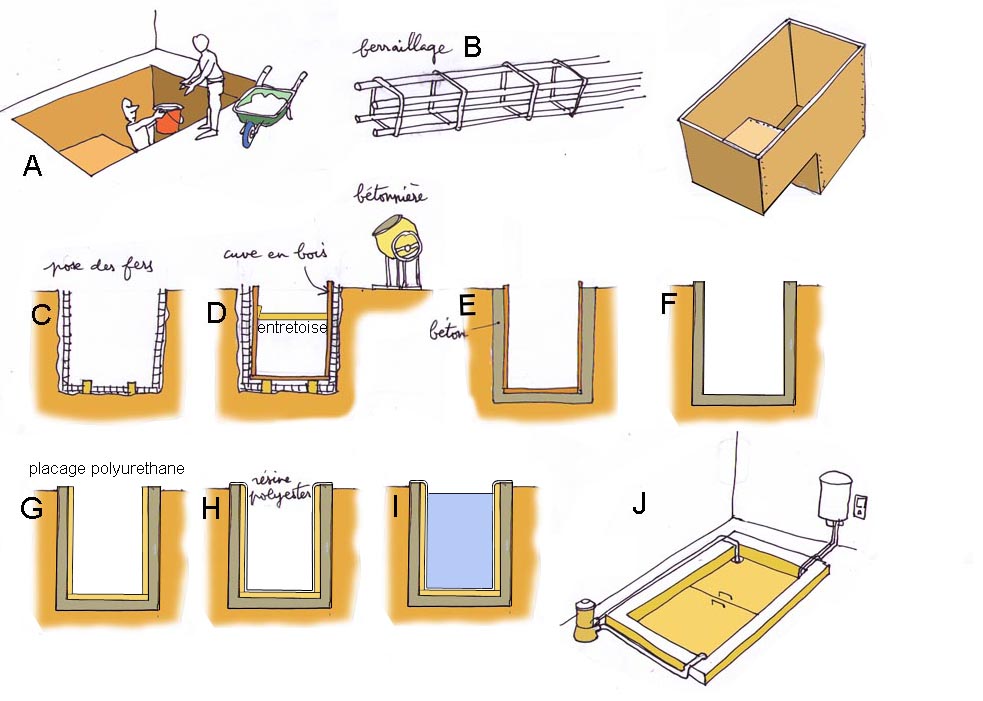
A much cheaper construction
In B, there are prefabricated steel bars available at any hardware store. 8 mm bars bent at 90° ensure structural continuity. The essential element is the pool shape, made from 19 mm marine plywood screwed together. Space between mold and earth wall: 10 cm. This mold can be used to make multiple pools. It’s essentially an internal mold, reinforced with crossbars. Wooden blocks are placed to support the plywood tank, ensuring its levelness. Concrete is poured (E); then the mold is removed and any gaps at the bottom filled.
You can see how this could become a small business venture, requiring minimal investment.
The mold made of panels allows this shape to be brought into a room via a standard door; the elements are then screwed back together inside.
Remove the internal mold (F). Then line the interior with 6 cm thick polyurethane sheets, glued using any adhesive (G). Final step: apply fiberglass resin lining plus “gel coat” (H). In (J), we see a hydrotherapy pool with a pump-filter-purification unit on the left and a rapid water heater with circulation pump on the right.
Materials:
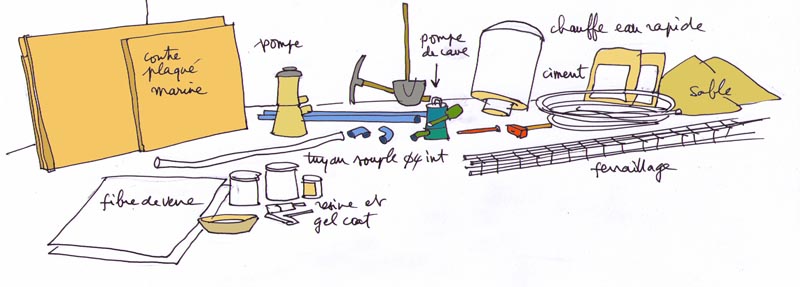
In the drawing, I forgot to show stacked 6 cm thick polyurethane sheets.
You can install the pool inside your house or in an adjoining room accessed via an interior (or exterior) door. Around the pool you can build a wooden shed or a greenhouse. Note that there’s no need to heat this room. Reason: pool water stays at 32–35°C. First, take a shower in your bathroom. Then slip into a thick, warm bathrobe. Upon entering the room, you find the pool and hang your robe on a hook. Instantly you’re in the water and never feel cold.
This reminds me of baths my son and I took in remote Icelandic regions, battered by winds, where we went with the Kraft family. Even though air temperature was just a few degrees above zero, we could strip off clothes and splash in hot spring water. The Krafts also showed us how to trigger geysers. A geyser is a column of water; at its base lies a heat source. Every ten meters corresponds to a pressure increase of one atmosphere. Boiling point rises with pressure; at the bottom of the column it exceeds 100°C. When enough heat arrives, a bubble forms. Rising to the surface, it carries hot water to a region of lower pressure where boiling point drops. The effect amplifies, and what reaches the surface is a huge steam bubble, whose size depends on the geyser’s power. It can represent several cubic meters. Sometimes geysers burst into a small lake whose water turns green due to algae growth.
When the bubble reaches the surface, liquid surface rises. Then the bubble bursts at the very top, releasing steam through that “hole.” This lasts but a fraction of a second.
If a geyser loses sufficient heat input, it stops. There’s a way to reactivate it, shown to us by the Krafts and known to all volcanologists: pour contents of a bottle of dish soap into the vent. This lowers water’s boiling point. It takes time for the soap to reach the bottom. Then the geyser erupts, spewing tens of thousands of soap bubbles.
Back to our pool story (I’m convinced some readers could earn money installing these pools for private clients or physiotherapists). Let’s describe accessories. Regarding pumping, filtration, purification, I reused a pump from a supermarket pool, equipped with a paper filter (easily cleaned with a hose, every three or four days).
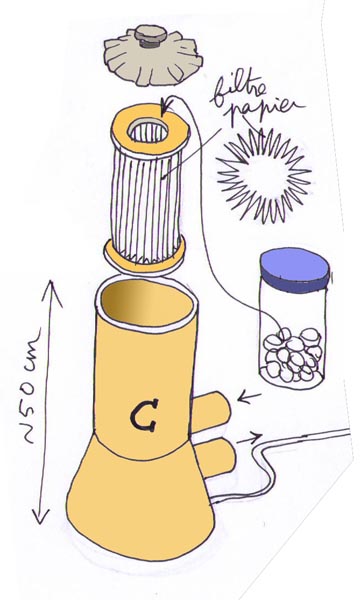
The pump found at a supermarket
Its role is to circulate all four cubic meters of water, filter it, and sterilize it. It turned out this pump was sufficient for the job, since it consumes little energy and runs continuously. Personally, I unplug it when using the pool, due to noise. Alongside the pump, I used 4 cm outer diameter corrugated pipes that connected to a garden pool, and which can link to rigid PVC pipes of 30 or 32 mm outer diameter. I found it easier to place suction near the surface and discharge deep below, which works flawlessly. Here’s the diagram:
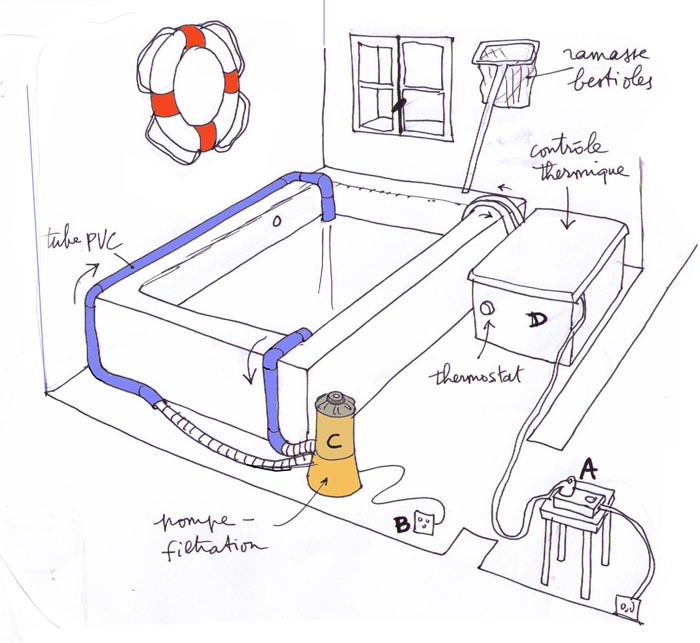
Pumping – Filtration – Sterilization
I couldn’t find a cork buoy to attach to the wall. If anyone has one, I’d love to have this accessory, which could save lives.
The diagram speaks for itself. While exercising in the pool, waves form; hence you shouldn’t fill it to the rim. Leave at least thirty centimeters between edge and water surface. The pump circulates water ten centimeters below surface, discharging it opposite side at bottom. After filling, pump must prime; this won’t happen if suction pipe contains air. Running pump dry risks burning out motor. So place pump on a stool, box, or bucket so its top—covered by gray screw-on cap—remains level with water. Remove the PVC “cavalier” pipe seen in foreground, linked to pump via flexible hose. Fill all parts with water using a hose. Once done, screw cap back on so water touches it. Block suction port with palm and submerge it. Now siphon is full of water. Plug in pump at B and it starts working; check via transparent corrugated pipes. First bubbles appear, then flow increases. Initially pump expels air, then water circulation begins.
Inside pump there’s a star-shaped paper filter where you can place tablets. I chose 3 cm diameter ones for oxygenating water; replace every three days. Also submerge a large “slow-release chlorine tablet” at bottom weekly. This setup works well for a daily hour-long soak. But mandatory:

Take a shower before each immersion!
Otherwise you’ll contaminate the water, which quickly turns foul. I’ve experienced this. If you follow this hygiene rule, you can limit chlorine use by placing slow-release tablet weekly. Even at high temperatures favoring bacteria growth, you can maintain purity using supermarket pump with oxygen-releasing tablets plus slow-release chlorine tablet weekly. Pool water stays clean for months.
In D, I depicted water heating and temperature maintenance system. My brilliant friend Jacques Juan placed a small industrial water heater with 4.5 kW resistance inside plastic box beneath DVD player. Water pumped via small central heating pump; thermostat-relay completes setup.
What matters isn’t exact configuration; this is a temporary test setup. Crucially, with such insulation, 4.5 kW resistance raises temperature one degree per hour. Depends on season; I keep pool at 35°C 24/7. If garden faucet delivers 18°C water, heating takes seventeen hours. But once target reached, thermostat knob locks temperature within fractions of a degree. Two pipes, like garden hoses: one ejects warmed water 50 cm below surface, other sucks from bottom. Temperature gain per pass is modest; even at 4.5 kW output, water remains lukewarm. Yet calorie by calorie, entire pool heats with minimal loss thanks to 6 cm polyurethane insulation.
Don’t make fatal mistake of using polystyrene; it dissolves in waterproof resin you’ll apply as final seal.
First-time filling requires ensuring pump body and suction pipe are full of water; achieved by pouring via garden hose for hours. Unless you install automatic shutoff valve, beware of forgetting to close faucet; overnight flooding may occur. Use alarm clock or overflow drain to outside.
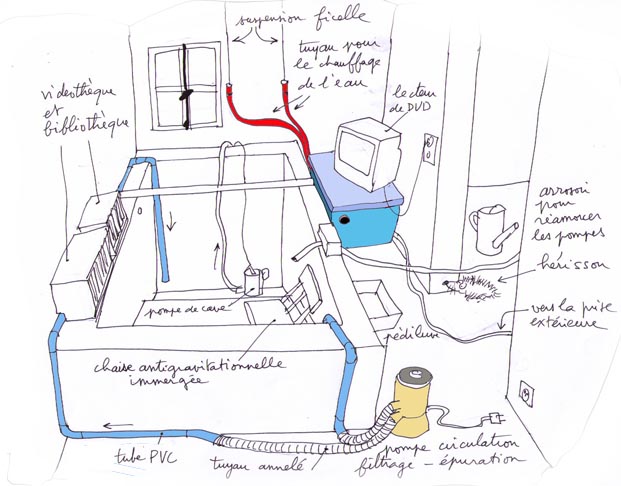
During water replacement. Red: heater pipes
Sketch shows pool during refill; from overhead view, blue PVC discharge pipe seen at bottom leading to low point. Water heater installed by Jacques Juan sits in plastic box under DVD player. Red lines indicate suction and discharge pipes kept elevated via ropes to avoid water loss. Basement pump visible; circulation and heater plugs disconnected. Water hose for filling also visible. Circulation-filter pump plugged into wall socket; heater plugged into stool-mounted outlet at entrance. I unplug both before each session to avoid ending up like Claude François.
Of course, looking at this diagram, you might think:
“What horrible makeshift wiring! Okay, connecting filter pump to wall socket is fine. But that wire feeding heater, trailing on floor, plugged into stool outlet?! How did this guy survive working with tens of thousands of amps and thousands of volts in MHD experiments? What a terrible example for readers, tempting them to electrocute themselves!”
You’re right. I simply couldn’t resist showing success of this project, especially regarding sizing of components and, later, thermal control effectiveness. Obviously, electrical setup shouldn’t be copied verbatim. This is merely provisional; safety ensured by unplugging everything upon entry. Still, never be careless. Best practice: place heater outside pool room, in dry spot far from water. Group all wiring in separate panel, safely hidden (say, in adjacent room). Entrust to licensed electrician who knows precautions; he’ll install differential circuit breaker.
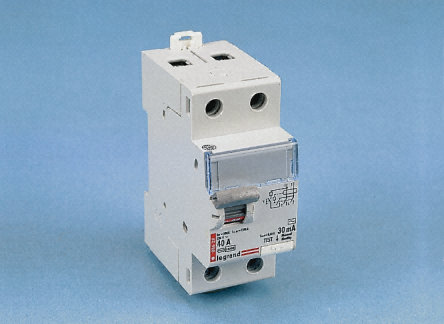
Differential circuit breaker
Brief aside on human resistance to electricity: my next comic will deal with this topic. What kills, when voltage is high enough for current to cross skin barrier, is current intensity. We tolerate a milliampere, one thousandth of an amp. Beyond ten to twenty milliamps, muscles contract uncontrollably; you can’t release gripped conductor. At 100 milliamps, passing through heart, muscle spasms occur. Burns follow.
Electrical outlet functions (very schematically) like pump with two pipes; fluid replaced by electrons. In AC circuits, absent leaks, same electron quantity exits opposite pipe synchronously. Device shown constantly checks this; if imbalance occurs, it cuts power—threshold usually ten milliamps, one hundredth of an amp.
Now, another innovation: first remote-controlled manual cleaning robot.
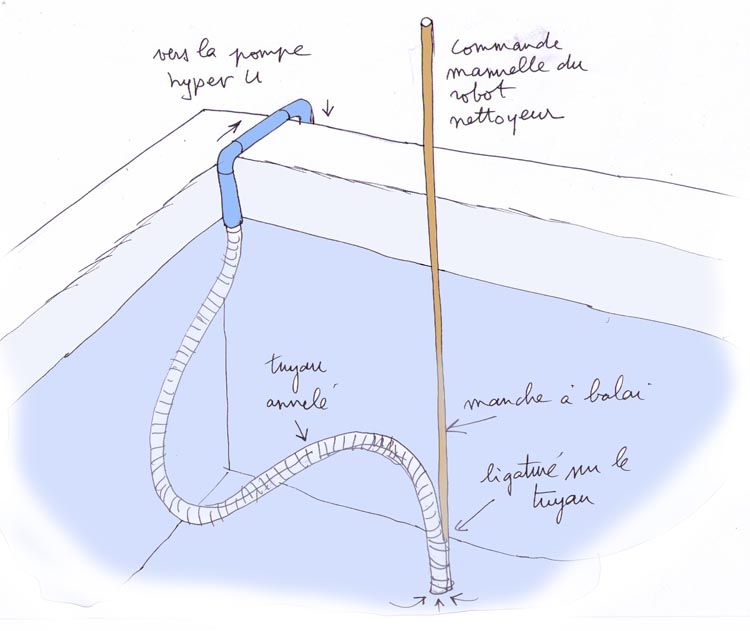
Remote-controlled cleaning robot
Quickly attach corrugated hose to pump suction port; steer via joystick-style remote on broom handle to suck debris from bottom. In one minute, pool floor is clean.
Submerged “anti-gravity chair” is useful accessory. It’s simply a white plastic garden chair denser than water; provides stable foothold when entering pool, preventing falls. To right, footbath tub lets soak feet before swimming. At doorway, my hedgehog friend Marcel visits when I bathe at night.
Across pool, wooden curtain rod used for exercises; later I’ll add ergonomic variant. Advantage: movable.
Missing key element enabling accidental yet vital discovery:
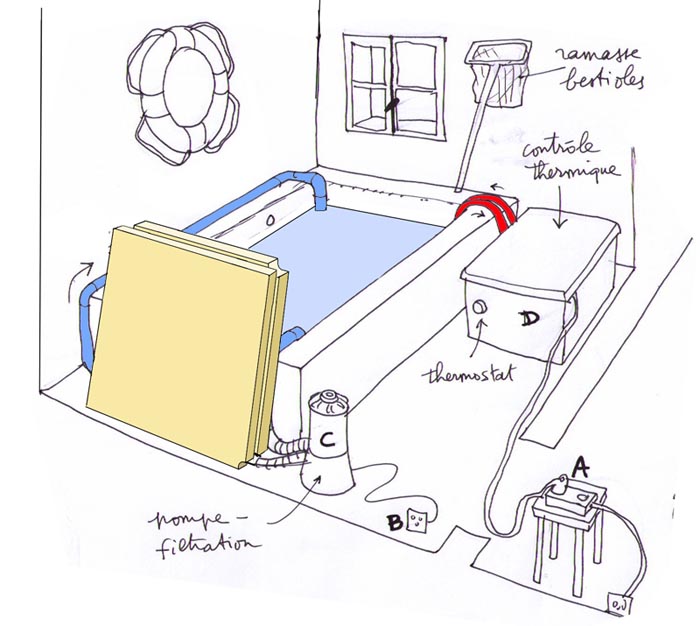
Thermal insulation panels—here: removed
Pool filled; both pumps running; water at 35°C. Post-exercise, cover pool with two cut and notched polyurethane sheets. During workout hour, heat loss minimal due to massive water volume and lateral/bottom insulation. Next day, if heater unplugged, temperature drops one degree only.
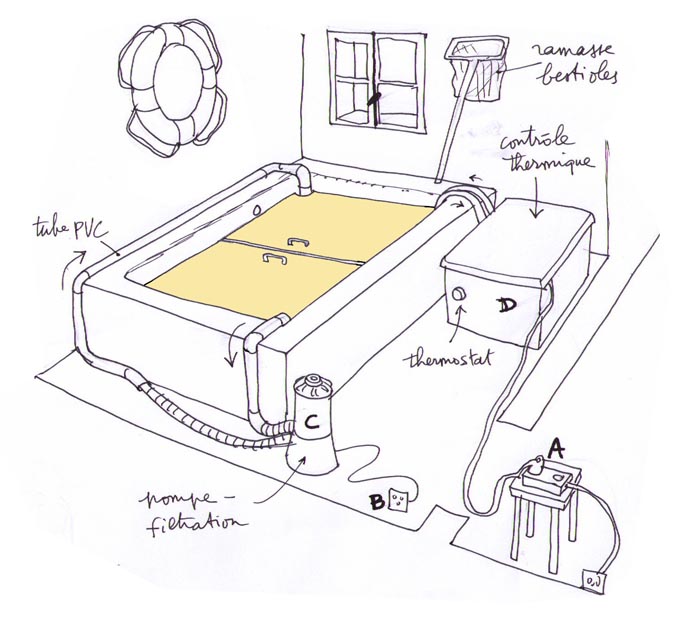
Cover panels placed over water
And here comes the unexpected!
Indeed, insulation is superb; heat loss minimal even in unheated room with open door at night. Heater off, pool cools one degree per twenty-four hours. But surprise: panels float atop water, blocking evaporation. If properly fitted, water surface area equals that of 35°C water in glass; thus evaporation negligible. Dry towels stay dry; book pages remain unhumidified; DVD player usable—yes, anywhere as if normal room. I installed DVD player and extensive video library (readers wanting to send DVDs/DivX films, welcome!).
But warning: forgetting to cover pool means next day everything gets wet. Ventilate and relocate electronics to dry heated room. I speak from experience; post-negligence screen turned blue due to faulty contacts. Kitchen drying restored order.
This pool is extraordinary accidental invention. Even using just one hour daily, evaporation remains minimal. Water evaporates only one hour per twenty-four. Thus can be placed inside house, even living room—unthinkable otherwise—provided covered with second set of stiff wood panels allowing walking. Just lay carpet over them; nobody suspects four cubic meters of 35°C water beneath feet.
Anti-gravity chair in “small bath” enables total weightlessness.
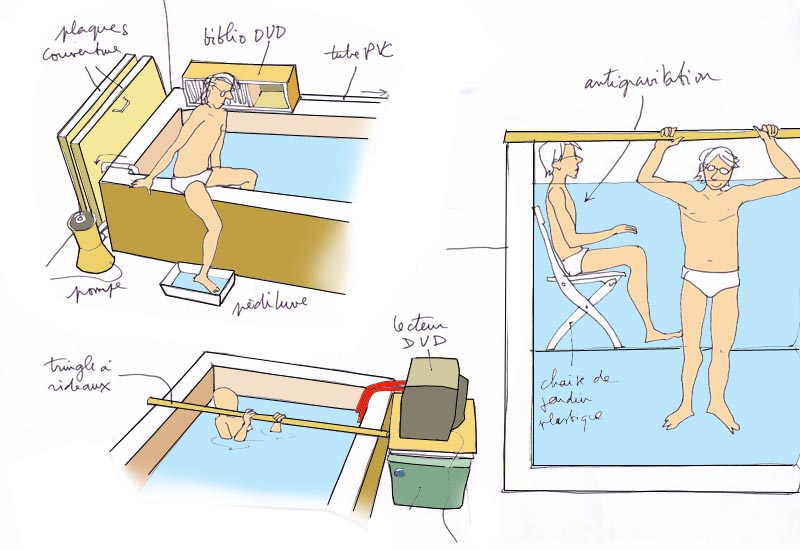
Spinal development (Jacques Juan)
Small bath fits two or four garden chairs. Today’s trend: 3D cinema. When will zero-gravity movie theaters emerge?
Friends occasionally enjoy this unique setup. Imagine dad telling kids: “Put on swimsuits; we’ll watch film with Mom.”
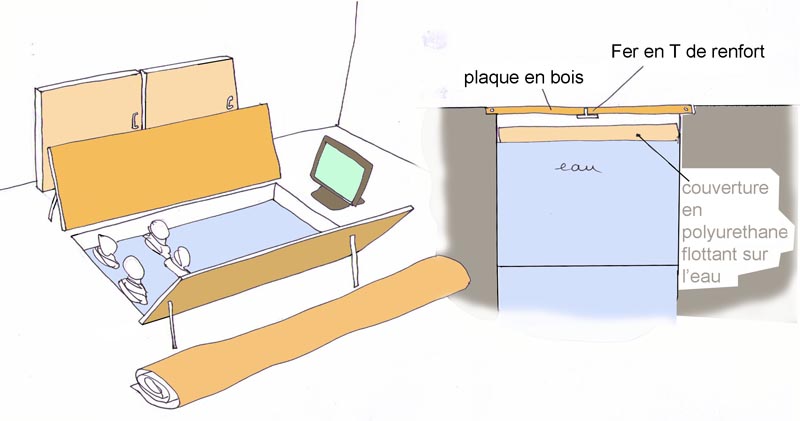
Family zero-gravity movie session
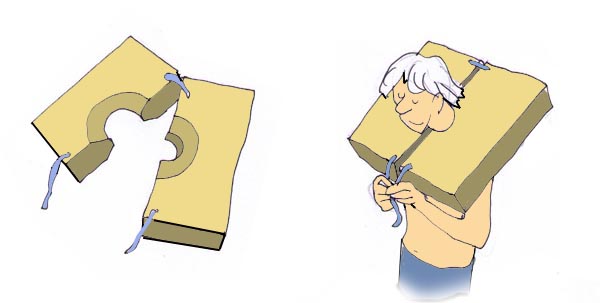
Finally, here’s Relaxotron, peaceful counterpart to ancient torture rack:

My adaptation uses two polyester sheets linked by nylon cords:
Who hasn’t dozed in warm bath, slipped, and drowned? Risk eliminated here. Experience astronaut sensation at modest cost: sleep in weightlessness. Thus born:
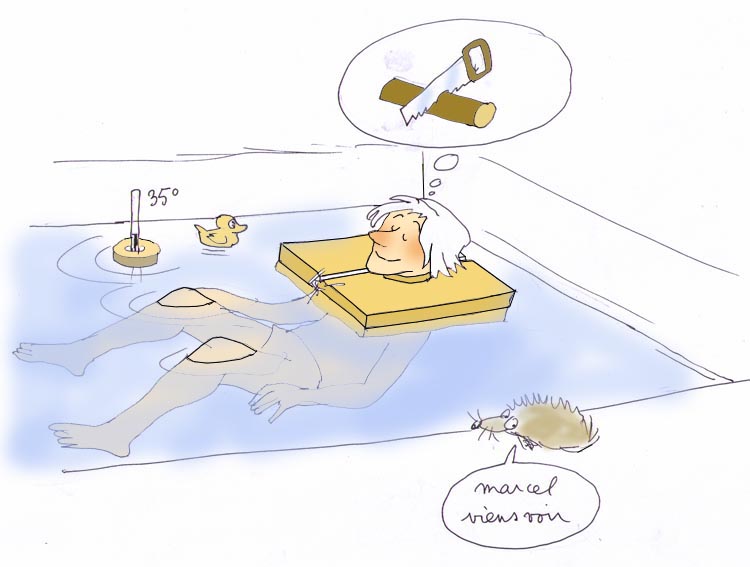
The Relaxotron: sleeping in weightlessness
Completing this guide took whole day. Not just to showcase inventor pride; choices proved wise, especially depths and dimensions. 1.35 meters (me) permits full leg spread. Two meters: full-body float. Depth allows vertical immersion and exit via curtain rod or later chrome tube/hooks.
Such self-manipulation impossible in “spa”; best remedy against spinal disc collapse. Believing parallel bars in hallway suffice is fallacy; muscles tense involuntarily under stress. Warm water relaxes them.
For thirty-three years I’ve used home system for lifelong rehabilitation; movements involve leaning on pool edge and pulling arms. Risk: stranger offers help: “Can’t get out? Take my hand!” “No thanks, doing hydrotherapy...”
Movements endless, gentle. Strengthens core muscles; weakening causes many ailments. Twisting motions feasible; vertical stance maintained via weighted sandals (with diving belt).
With age, sedentary lifestyle weakens spine; discs dehydrate and bulge.

P: Disc protrusions. G: Vertebral slippage (spondylolisthesis)
Weight control also vital; extra pounds equal backpack load straining spine/knees/hips. Pool ideal for seniors fond of water. Home gym option too; stationary bikes exist. Hydrotherapy complete workout; flippers boost leg effort. No joint compression; “move without strain.” Physiotherapists will note: double pool capacity allows four clients simultaneously; one does vertical exercises in “large bath”, other in shallow end. Naturally, clinic must avoid humidity; DVD player placement tricky.
At advanced age, immobility threatens; hydrotherapy combats muscular/articular decay (joints atrophy without use!). Transfer possible via pulley system operated by helper; found in rehab centers. Document proves affordable home installation; long-term investment. Retirement homes lacking pools would greatly benefit from hydrotherapy pools (with DVD players). We all age; more and more, as Monsieur de La Palisse would say. Oscar Wilde’s quip remains true:
I know no one’s eternal.
Yet I hoped God would make exception for me